Q: I’m training new painters on how to professionally mask a job. What tips can you give me for helping them use a hand masker effectively?
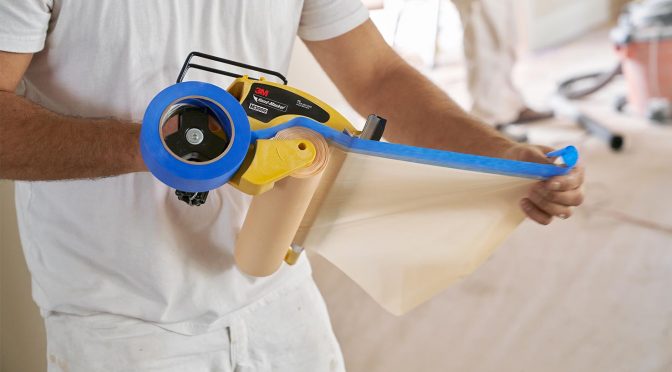
A: Prep is key to the success of any paint job and masking is a big part of that. Using the 3M™ Hand-Masker M3000 Dispenser, or a similar masking tool, can turn a multi-person job into a single-person effort if the pro knows how to use it correctly. In this article are a few tips I recommend for anyone using the tool for the first time.
1. Get comfortable with assembly
Learning how to assemble the tool is an important first step in helping anyone feel comfortable using it. It’s a relatively simple three-step process. Start by inserting the cutting blade into the hand piece. You’ll notice there are four tape width options and a pin-hole slot for each one.
Insert the blade into the correct slot for your tape width. Make sure you hear a click so you know it’s locked in place. After that, slide the film roll on and attach the stabilizing bar by simply sliding it down until it connects with the film or paper roll.
The third step involves placing the tape on the hub and tracking it onto the tool. At this point, you can pull the tape and easily marry it to the plastic or paper. The first few minutes of this video allows you to see the process in action.
Once the tool is correctly assembled, have your crew member take it apart and reassemble it several times until they’re comfortable with the process. It’s also important to note that the masker is a right-handed tool. So, a lefty will need to adjust and perhaps take a little more time to get comfortable with it.
2. Practice tearing the tape
Once you have the device assembled, practice tearing the tape and film—but don’t practice on an actual wall surface. First, simply tear the film and tape away from you with the tool in your hand. The biggest thing to remember with tearing is that once you start, you have to commit and pull all the way through the film and tape. Never stop halfway through or you’ll run the risk of damaging the film roll and wasting materials.
3. Practice on a window or wall
When going across the top of the window, you want to move from left to right, pushing down the tape with your left hand as you go. For the last 12 to 18 inches, grab the tape and film with your left hand and then rotate the masker out 90° toward you so you are not cutting into the wall or window. This also allows you to use the space behind you to rotate the tool so you can fully tear through both the film and tape.
People commonly extend their right hand out fully when moving from left to right. In order to have more control, you want to keep your right elbow at 45°, and then let your elbow and hand roll—in one motion—away from you. This will help to better assure you of an even cut through the film and tape. Again, it takes practice.
4. Practice with different films
Our 3M Hand-Masker M3000 Dispenser works with different plastic film and paper widths. Some rolls extend to 99” in length to cover something like a patio door, but come in 9” to 12” width rolls so they can fit on the masker. After you make your cut, you can then pull down the film to its full length.
It’s also a good idea for your crews to have more than one tool available to them. If you have several already set up in the toolbox with different film widths, your teams won’t need to be swapping out materials more than necessary in a day. At the start of your workday, figure out which ones you’ll need and assemble them before the day starts.
A final note
Using this tool is a time-saver. It prevents your team from needing one painter to hold the film in place while another tapes around the edges. With a masking tool, one person can mask off a large window or wall in minutes while another person focuses on trim or other prep. Allow for a little extra time to let you crewmembers get comfortable with the masking tool. They’ll reward you with improved efficiency and future time savings.
This article was written by Jeff Malmer, an Advanced Application Engineering Specialist for 3M. He has 40 years of masking product development experience and regularly trains 3M customers, end-users, and sales professionals on proper use of the many masking products the company produces.


