
Refinishing cabinetry is the quickest way to refresh a kitchen. Being skilled, knowledgeable and experienced in cabinet refinishing can be a huge competitive advantage. Here are eight steps to transforming dated or worn-out cabinets to make any space look completely new.
1. Remove doors and drawers
To begin, number your doors and drawers so you know exactly where each one goes. Even if all the drawers look the same, there may be slight differences that can cause issues once you put your freshly painted cabinets back together again.
Tip: Prepare baggies so your handles and hardware don’t get lost. If installing new hinges or handles, drill and patch all holes before you start painting.
2. Wash and prep
This is the most important step – don’t overlook it. Thoroughly wash all areas that you plan to paint with a good cleaner, degreaser or an emulsifying dish soap. Rinse with clean water and let it dry before you continue to the next step. Mask or tape off your cabinet box – you should only paint the face and interior edges of your cabinetry.
Tip: After washing, test a small area with your primer of choice. If it adheres well, sanding may not be necessary.
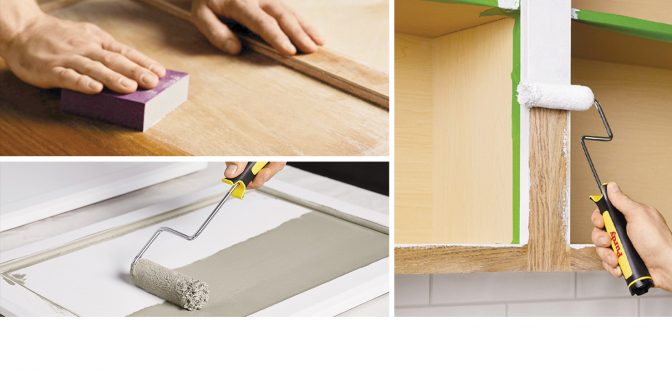
3. Scuff sand
Scuff sand your cabinetry to create a surface profile that will better help the primer adhere. If there are any holes or imperfections, patch them with a quality wood putty or filler and then sand it down to create a smooth surface. Wipe the sanding dust off the cabinets with a damp rag and clean water and let dry.
4. Prime
Choose your primer. If you’re painting a slick surface or trying to cover up a dark finish, an adhesion promoting primer may be necessary. Use a mini-roller system to create a smooth primed surface on the doors and drawers as well as the frame. Spray application is also an option.
Tip: For laminate or previously painted wood cabinets, use an adhesion-promoting primer like Extreme Bond™ Primer. For unfinished wood, use Premium Wall & Wood Primer.
5. Fine sand
Once the primer has dried, use a very fine-grit sandpaper and scuff sand to get rid of any bumps, grooves, lint or dust that has appeared on your cabinetry. If you apply your finish before this step, any imperfections will be magnified.
Tip: After sanding, clear away the dust with a damp rag and let it dry before moving on.
6. Apply the finish
Whether using a roller and brush or a spray application, always take your time and apply in the direction of the wood grain. If working with laminate, simply apply the paint evenly and vertically. To avoid runs, use the right amount of paint and don’t overwork it. Quickly smooth out any drips.
Tip: If you notice drips and runs after the paint has dried, remove them with a putty or razor knife, lightly sand the affected area, and repaint if necessary.
7. Apply another coat
Go over your doors, drawers, and the frame once more, paying extra attention to the areas that need it most.
8. Let dry and reconstruct
Allow at least 24 hours of dry time – the longer the better. You want to avoid any dents or peeling that may occur with reattaching your doors, drawers and hardware. Because you numbered them and kept your hardware organized, this should be a breeze.
This article was originally published in the Fall 2020 issue of Pintor Pro magazine. Read more stories about coatings and application techniques in the Pintor Pro archive.


